

Features
Caching
For extreme load or denial of service attacks, it might be too expensive to call redis for every incoming request, just to find out it should be blocked because they have exceeded the limit.
You can use an ephemeral in memory cache by passing some variable of type
Map<string, number> as the ephemeralCache option:
const cache = new Map(); // must be outside of your serverless function handler// ...const ratelimit = new Ratelimit({ // ... ephemeralCache: cache,});By default, ephemeralCache will be initialized with new Map() if no value is provided
as the ephemeralCache parameter. To disable the cache, one must pass ephemeralCache: false.
If enabled, the ratelimiter will keep track of the blocked identifiers and their
reset timestamps. When a request is received with some identifier ip1 before the reset time of
ip1, the request will be denied without having to call Redis. reason field of the
limit response will be cacheBlock
In serverless environments this is only possible if you create the cache or ratelimiter instance outside of your handler function. While the function is still hot, the ratelimiter can block requests without having to request data from Redis, thus saving time and money.
See the section on how caching impacts the cost in the costs page.
Timeout
You can define an optional timeout in milliseconds, after which the request will be allowed to pass regardless of what the current limit is. This can be useful if you don't want network issues to cause your application to reject requests.
const ratelimit = new Ratelimit({ redis: Redis.fromEnv(), limiter: Ratelimit.slidingWindow(10, "10 s"), timeout: 1000, // 1 second analytics: true,});Default value of the timeout is 5 seconds if no timeout is provided. When response
is success because of a timeout, this is shown in
the reason field of the limit method.
Analytics & Dashboard
Another feature of the rate limiting algorithm is to collect analytics.
By default, analytics is disabled. To enable analytics, simply set the analytics parameter to true:
const ratelimit = new Ratelimit({ redis, analytics: true, limiter: Ratelimit.slidingWindow(60, "10s"),});Everytime we call ratelimit.limit(), analytics will be sent to the Redis database
(see costs page)
and information about the hour, identifier and the number of rate limit success and
failures will be collected. This information can be viewed from the Upstash console.
If you are using rate limiting in Cloudflare Workers, Vercel Edge or a similar environment, you need to make sure that the analytics request is delivered correctly to the Redis. Otherwise, you may observe lower numbers than the actual number of calls.
To make sure that the request completes, you can use the pending field returned by
the limit method. See the
Asynchronous synchronization between databases
section to see how pending can be used.
Dashboard
If the analytics is enabled, you can find information about how many requests were made with which identifiers and how many of the requests were blocked from the Rate Limit dashboard in Upstash Console.
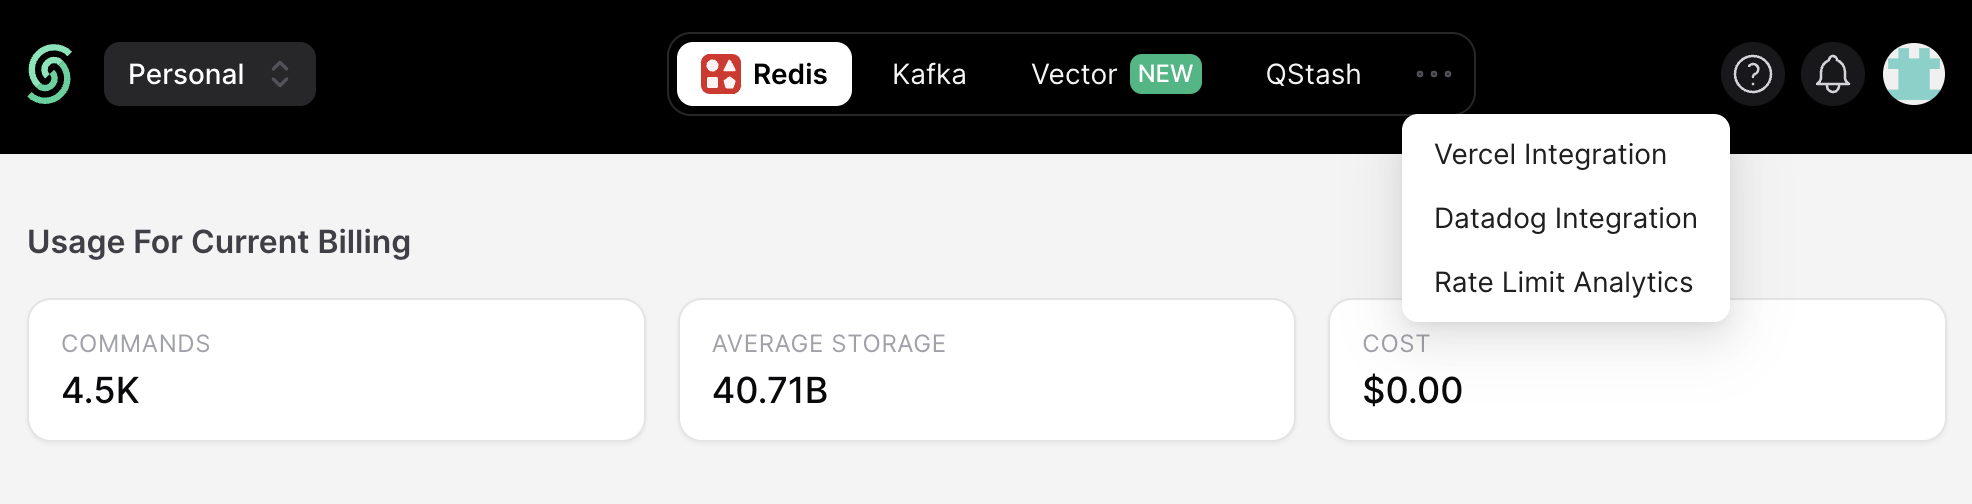
To find the dashboard, simply click the three dots and choose the "Rate Limit Analytics" tab:
In the dashboard, you can find information on how many requests were accepted, how many were blocked and how many were received in total. Additionally, you can see requests over time; top allowed, rate limited and denied requests.
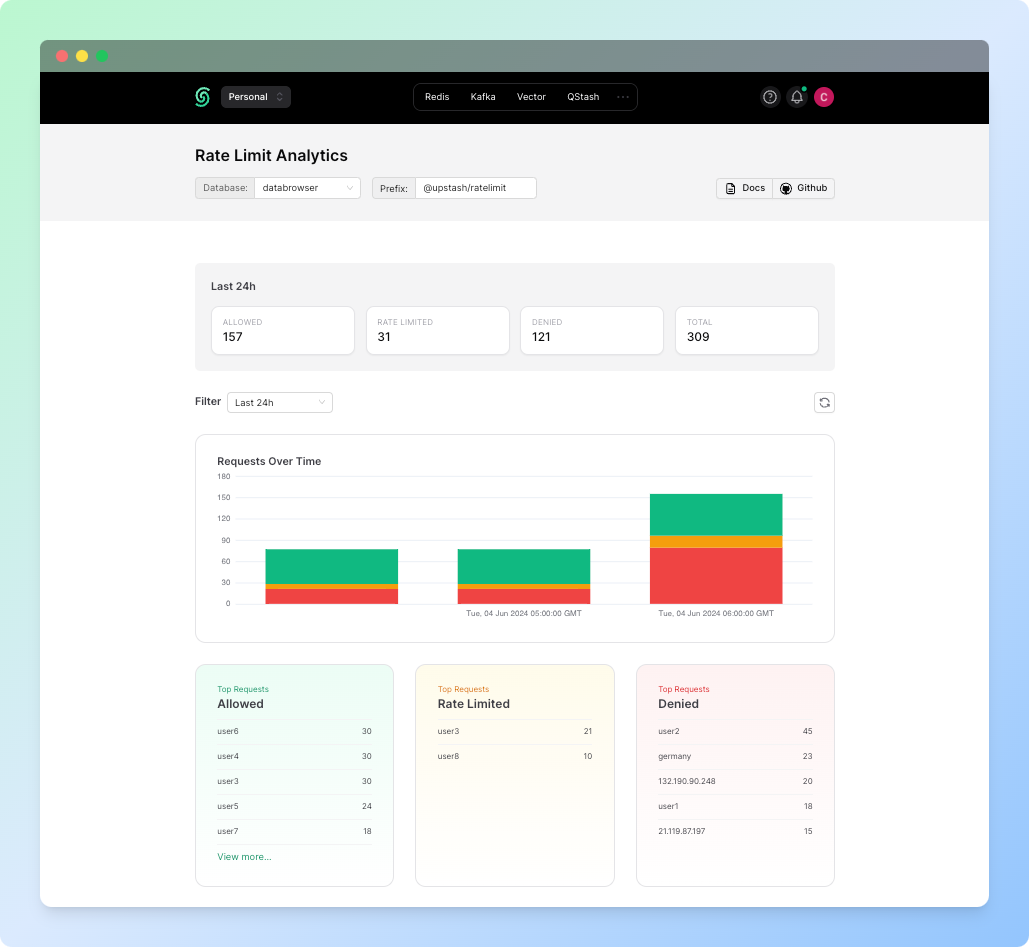
Allowed requests show the identifiers of the requests which succeeded. Rate limited requests show the identifiers of the requests which were blocked because they surpassed the limit. Denied requests show the identifier, user agent, country, or the IP address which caused the request to fail.
If you are using a custom prefix, you need to use the same in the dashboard’s top left corner.
Using Multiple Limits
Sometimes you might want to apply different limits to different users. For example you might want to allow 10 requests per 10 seconds for free users, but 60 requests per 10 seconds for paid users.
Here's how you could do that:
import { Redis } from "@upstash/redis";import { Ratelimit } from "@upstash/ratelimit";const redis = Redis.fromEnv();const ratelimit = { free: new Ratelimit({ redis, analytics: true, prefix: "ratelimit:free", limiter: Ratelimit.slidingWindow(10, "10s"), }), paid: new Ratelimit({ redis, analytics: true, prefix: "ratelimit:paid", limiter: Ratelimit.slidingWindow(60, "10s"), }),};await ratelimit.free.limit(ip);// or for a paid user you might have an email or userId available:await ratelimit.paid.limit(userId);Custom Rates
When we call limit, it subtracts 1 from the number of calls/tokens available in
the timeframe by default. But there are use cases where we may want to subtract different
numbers depending on the request.
Consider a case where we receive some input from the user either alone or in batches. If we want to rate limit based on the number of inputs the user can send, we need a way of specifying what value to subtract.
This is possible thanks to the rate parameter. Simply call the limit method like the
following:
const { success } = await ratelimit.limit("identifier", { rate: batchSize });This way, the algorithm will subtract batchSize instead of 1.
Multi Region
Let's assume you have customers in the US and Europe. In this case you can create 2 separate global redis databases on Upstash (one with its primary in US and the other in Europe) and your users will enjoy the latency of whichever db is closest to them.
Using a single Redis instance with replicas in different regions cannot offer
the same performance as MultiRegionRatelimit because all write commands have
to go through the primary, increasing latency in other regions.
Using a single redis instance has the downside of providing low latencies only
to the part of your userbase closest to the deployed db. That's why we also
built MultiRegionRatelimit which replicates the state across multiple redis
databases as well as offering lower latencies to more of your users.
MultiRegionRatelimit does this by checking the current limit in the closest db
and returning immediately. Only afterwards will the state be asynchronously
replicated to the other databases leveraging
CRDTs. Due
to the nature of distributed systems, there is no way to guarantee the set
ratelimit is not exceeded by a small margin. This is the tradeoff for reduced
global latency.
Usage
The API is the same, except for asking for multiple redis instances:
import { MultiRegionRatelimit } from "@upstash/ratelimit"; // for deno: see aboveimport { Redis } from "@upstash/redis";// Create a new ratelimiter, that allows 10 requests per 10 secondsconst ratelimit = new MultiRegionRatelimit({ redis: [ new Redis({ /* auth */ }), new Redis({ /* auth */ }), new Redis({ /* auth */ }), ], limiter: MultiRegionRatelimit.slidingWindow(10, "10 s"), analytics: true,});// Use a constant string to limit all requests with a single ratelimit// Or use a userID, apiKey or ip address for individual limits.const identifier = "api";const { success } = await ratelimit.limit(identifier);Asynchronous synchronization between databases
The MultiRegion setup will do some synchronization between databases after returning the current limit. This can lead to problems on Cloudflare Workers and therefore Vercel Edge functions, because dangling promises must be taken care of:
const { pending } = await ratelimit.limit("id");context.waitUntil(pending);See more information on context.waitUntil at
Cloudflare
and Vercel.
You can also utilize waitUntil from Vercel Functions API.
Dynamic Limits
Dynamic limits allow you to change rate limits at runtime without recreating the rate limiter instance. This is useful when you need to adjust limits based on user tiers, system load, or other dynamic factors.
To enable dynamic limits, set the dynamicLimits option to true when creating the rate limiter:
const ratelimit = new Ratelimit({ redis: Redis.fromEnv(), limiter: Ratelimit.slidingWindow(10, "10s"), dynamicLimits: true, // Enable dynamic limits});// Set a global dynamic limitawait ratelimit.setDynamicLimit({ limit: 5 });// All subsequent limit checks use the new limitconst { success } = await ratelimit.limit("user_123");// Get current dynamic limitconst currentLimit = await ratelimit.getDynamicLimit(); // returns 5// Remove dynamic limit (falls back to default)await ratelimit.setDynamicLimit({ limit: false });Dynamic limits work with the following single region algorithms: fixedWindow, slidingWindow, tokenBucket, Multi region algrorithms aren't supported.